Renkon-Pad: A Live and Self-Sustaining Programming Environment Based on Functional Reactive Programming

Abstract
Renkon-pad is a live programming environment based on a Functional Reactive Programming language called Renkon. In Renkon-pad, the user creates text boxes to write reactive expressions. The user can also create any number of “runner” windows (separate execution environments) to run the program. The user can modify the program and update a running runner or create a new one to experiment quickly.
The FRP-based model of the Renkon language is conducive to programming in node-and-wire dataflow diagrams. However, Renkon-pad does not employ a typical node-and-wire visual representation. The dependency relationships are expressed in code as text rather than by connecting boxes with wires. Additionally, a text box can contain any number of expressions. This design helps scale the size of a program that the user can handle in the environment. In other words, the programmer has greater flexibility in organizing their program in a logically meaningful way. The application analyzes the dependencies among expressions and visualizes the dependencies in the program to aid comprehension.
Renkon-pad is powerful enough to create and live-edit non-trivial applications, including itself. The bootstrapping version of Renkon-pad, with text box and runner window management, user interaction, interfacing with a virtual DOM library, the file save and load feature, and dependency visualization, is implemented in about 700 lines of Renkon and CSS definitions.
Keywords and phrases:
Live Programming, Functional Reactive Programming, Live Development EnvironmentCopyright and License:
2012 ACM Subject Classification:
Software and its engineering Integrated and visual development environmentsSupplementary Material:
Software: https://github.com/yoshikiohshima/renkon-padarchived at
Editors:
Jonathan Edwards, Roly Perera, and Tomas PetricekSeries and Publisher:
1 Introduction

The need for an end-user programming environment, especially one that allows users to utilize AI models, is stronger than ever. The authors believe that program comprehension by human users will remain important even with AI models involved. This suggests that creating a new environment that is approachable for both humans and AI models will be crucial.
The authors have been working on a local AI project called Project Substrate [3]. Substrate aims to provide hardware and software for running AI models at home. We are exploring ideas around an AI-friendly end-user programming environment, in particular a malleable one where participating AI agents and humans can modify the environment itself dynamically.
(See the footnote111Since a version of Renkon-pad was submitted and reviewed by the PX/25 committee, there have been new features such as infinite panning and zooming, deactivating a text box, etc. You can find the submitted version here: https://yoshikiohshima.github.io/renkon-pad/px25/ You can also try running Renkon-pad within itself: Open: https://yoshikiohshima.github.io/renkon-pad/px25/?file=https://yoshikiohshima.github.io/renkon-pad/px25/renkon-pad.json in a browser. Once opened, press the “runner” button at the top left, and then press the “play” button at the top left of the created runner window. This should show the embedded Renkon-pad in the runner window. You can also check out the latest development at https://yoshikiohshima.github.io/renkon-pad/. for information on the version in the paper and the latest development.)
Among end-user programming systems, there have been many attempts to provide end-user programming environments with the dataflow execution model and node-and-wire diagram visualization, such as Fabrik, LabView, Blender’s data flow, Natto.dev, and Max/MSP, just to name a few [1][2][4][9]. The node-and-wire diagram works well when the program is relatively small; however, it does not scale well visually for large programs.
On the other hand, the authors believe that the dataflow concept is powerful and scales well for large programs, with favorable characteristics that suit end-users. This is why we are motivated to experiment with the dataflow model again to better understand where the scalability issues arise.
We decided to use Functional Reactive Programming (FRP) as the foundation [7] for the dataflow execution model. The strength of FRP lies in its computation model, which uses an explicit logical time domain, making the program state easier to reason about.
Based on these considerations, the authors created a language called Renkon. A program written in Renkon is a set of reactive expressions, or nodes. The free variables in an expression are used to determine the dependencies among nodes.
The original FRP distinguishes between time-varying variables on a continuous time domain, called “behaviors,” and those on a discrete time domain, called “events.” The value of this distinction is often overlooked in later languages described as reactive, such as Elm and React [5][19], but the authors believe that this distinction is helpful for writing applications, particularly when dealing with graphics and user interactions.
The surface syntax is a subset of JavaScript, but the expressions are connected via free variable references. For example, the following code snippet defines a node and binds it to a variable timer1, and defines another node that has console.log(timer1):
Notice that the variable timer1 is defined on line 1 and used on line 2, creating a dependency relationship between these lines. The Renkon evaluator topologically sorts the nodes based on their dependencies and, during an evaluation step, traverses the sorted list to evaluate nodes as necessary. The definition of the expression bound to timer1 can be changed at runtime, without touching the expression with console.log; it simply picks up the latest value coming from timer1 at runtime, thus making the connection loosely coupled.
The expression Events.timer(1000) updates every 1000 logical milliseconds, causing timer1 to be updated. The second line with console.log executes when the node bound to timer1 is updated. Running this program results in a clock value displayed in the console every second.
While the language is agnostic to any graphics system, a Renkon program running on a web page can manipulate the browser’s DOM. The program can simply manipulate the DOM elements directly, but by using a virtual DOM library such as Preact [18], applications can be structured so that the logic remains in a pure functional style, up to the point of generating virtual DOM elements. These virtual DOM elements can then be rendered to the actual DOM.
We have developed a graphical programming environment called Renkon-pad in Renkon. In Renkon-pad, users can create text boxes to edit the program. A text box can contain any number of node definitions. They can also create separate execution environments called “runners” (in an iframe) to quickly test the program. The code running in a runner can be updated dynamically. Multiple runners can be created within the environment, allowing programs to be run simultaneously. The running application’s data is kept in the runner, enabling updated programs to be tested with pre-existing data.
In the following sections, we will show how Renkon-pad can improve Renkon-pad itself. Despite being a fairly sophisticated application with saving and loading capabilities, the minimum self-sustaining implementation consists of only about 700 lines of Renkon code, including 150 lines of CSS definitions.
We summarize the novelty of our approach below:
-
A clean and practical design of the underlying language.
-
A set of best practices to effectively utilize the language’s power in application development.
-
An architecture for a programming environment that supports live editing and side-by-side comparison of variations.
In the following sections, we provide a more detailed explanation of the Renkon language, describe the implementation of Renkon-pad, two examples created in Renkon-pad, and share our initial experiences using it.
2 Renkon
Renkon is an FRP (Functional Reactive Programming) language. The implementation is written in JavaScript so that it can be used in the browser as well as in Node.js. A program in Renkon consists of a set of reactive nodes. Each node reacts to input changes and produces an output. In turn, other nodes that depend on the output value react to it. In other words, the program nodes form an acyclic dependency graph, and changes propagate through it. FRP has an explicit notion of logical time. This means that a node is evaluated at most once at a logical time, even if there are multiple inputs for the node, and computation takes zero logical time.
Renkon’s surface syntax is a subset of JavaScript and TypeScript; most JavaScript syntax is also valid Renkon syntax. The Renkon transpiler takes the node definition and creates a JavaScript expression that evaluates to an internal Renkon node data structure. Care is taken so that an unmodified JS Linter works with a Renkon program (a set of nodes) and spots common errors.
The Renkon transpiler analyzes the definition of a node and notes all external variable references as dependencies. The transpiler works on each node in isolation; a node is completely unaware of what an external reference points to at transpilation time. In other words, the nodes are loosely coupled.
The evaluator topologically sorts the list of nodes based on the dependency relationships. Upon entering a new logical time, the Renkon evaluator walks through the nodes in the list and evaluates them as necessary.
Renkon stands out from other reactive web UI frameworks in three ways:
-
Promises and Generators in JavaScript are integrated with the dependency propagation logic.
-
Following the original FRP, discrete events and continuous values are separated.
-
The definition of reactive nodes can be changed at runtime.
Integrating JavaScript Promises means that the resolved value from a Promise is treated as a value update in Renkon without needing to add await or then. The following hundred is a Promise, but you can change the definition to an expression with a non-Promise value without modifying the rest of the code.
Having the separation between discrete and continuous values provides a way to express the intention of how a value will be used, aiding in writing user interface programs.
Since the nodes are loosely coupled and connected only by their named references, the definition of a node can be dynamically updated independently. For example, the node at line 3 in the above example (the console.log line) only knows that it depends on external nodes named hundred and timer1 but does not know what they are at transpilation time (it also depends on console, but it is treated as a known constant). The definition of timer1, for instance, can be changed from one evaluation step to another, without requiring the node with console.log to be changed. When the value of timer1 changes, either because the timer fires or the definition has changed and the value it produces is different, the console.log line reacts to it in the same manner.
To build a graphical application, the user can directly mutate the DOM elements on the page, but also use a virtual DOM library that treats virtual DOM elements as functional values computed by nodes in Renkon. While Renkon is completely agnostic to such a library, we find that Preact is a good match. An example usage of Preact and Renkon looks like the following:
We import html and render from the standard Preact library. The JavaScript built-in import expression returns a Promise, but the Renkon evaluator handles a promise automatically so that a resolved Promise is treated like any other reactive value. All dependencies that use html, for example, will not be evaluated until the node named html has a value. The html function of Preact processes the DOM tree definition in “Hyperscript Tagged Markup” [12]. When it is followed directly by a backquoted string, it processes the string to return an object – in this case, Preact’s virtual DOM elements.
The render function of Preact calculates the difference between the current actual DOM state and the virtual DOM and updates the actual DOM elements. The second argument for the render function specifies the actual DOM element that will be the parent of the rendered results.
2.1 Combinators
Renkon provides a number of “FRP combinators” to specify different flows of data and control in the program. Combinators connect reactive expressions in ways that simple variable references cannot, and allow a program to be more expressive. The full list of combinators can be found in the documentation of Renkon [13]. In this paper, we mention a few common ones.
Let us start with Events.or. A combinator is either an event or a behavior, and its name is preceded by “Events” or “Behaviors.” The Events.or combinator takes any number of other events as arguments, and when any one of them has a value at a logical time, that value becomes the value of the Events.or combinator at that logical time. For example, if there is a program with the following code:
The node bound to the oneOf variable gets a new value when either button or timer fires. And recall that if there is a node that refers to the variable oneOf, that node will be evaluated with the new value.
Another common combinator is collect. One can consider this analogous to the “followed-by” construct in some synchronous languages such as Lucid [17]. It is also like reduce in JavaScript, but it processes values arriving over time. It computes a new value when the trigger at the second argument position fires. The new value of collect is computed by a two-argument function that is invoked with the previous value and the trigger’s value. For example:
The id variable represents a behavior that updates when the createRequest event occurs. The function in the third argument of collect computes the new value using the current value and the request’s value. The underscore in the argument name is just a convention used to provide an informative name for the developer and the linter to indicate that the variable is unused.
The collect combinator can be either an event or a behavior222On a truly continuous time domain, there is no “previous” value for a behavior; the meaning is implementation dependent. You can consider Behaviors.collect(..) as a shorthand for Behaviors.keep(Events.collect(..))..
When writing a program, one might consider using an event variation of collect when associating an “event-like” meaning to it. For example, you might write:
This line is almost the same as the previous example, but the name newIdRequest conveys that it represents a request that exists only at a logical time. A dependent of newIdRequest handles the event update only at the logical time when the event occurs. Note that the initial value is undefined, indicating that there is no request when the application is starting (cf. Section 2.2).
There are natural conversions between events and behaviors. To convert an event to a behavior, we retain the “last value fired” to create a continuous view of it. We use Behaviors.keep for this purpose. The example below uses newIdRequest from the previous example but keeps the last value.
In other words, Behaviors.keep makes a total step function on the time domain, and its value is derived from a partial function on the time domain.
A behavior can be converted to an event by detecting when a change occurs:
Another commonly used combinator is select. The select combinator is similar to collect, but it supports multiple branches. This is useful for defining an event or a behavior that reacts to multiple possible events. For example, suppose we have a time-varying array called collection. The array grows when a timer fires but resets to empty when the “reset” event occurs. That behavior can be written as:
The first argument is the initial value (an empty array), and the remaining arguments are pairs of event triggers and their corresponding reaction functions.
2.2 Values and Equality Tests
An event in FRP is a partial function on the time domain. This means that the function does not have a value, or is undefined at certain logical times. At the same time, we also need a value that indicates an empty value.
Conveniently, JavaScript already has undefined and null. We can simply use undefined to indicate that the value of a node is not defined at a logical time and use null to indicate an empty value.
The criterion for evaluating a node, in general, uses object equality (===) to compare the values in the list of dependency values with the last values when the node was last evaluated. If any input is different, the node is evaluated.
This strategy is simple and straightforward but requires some consideration when a Map or other mutable collection object is used. As shown in Section 3, we use a pattern to wrap the Map in an object. With the collect combinator explained below, a Map object can be used as a value:
When trigger occurs, the Map inside simply gets a new entry. However, the value of values is a fresh object that contains the same Map. This ensures that downstream dependents detect the change (as the triple equal test yields false), allowing the update to propagate.
2.3 Node Definition with a JavaScript Function
The definition of a node may need local variables or JavaScript control structures. In that case, one can use a JavaScript function and “immediately evaluate” it. For example, the following count node gets a value when the collection node’s value is updated, as the collection reference in line 7 is a free variable. That triggers the evaluation of the function, and the value returned on line 6 becomes the value of count.
The body of the function contains a reassignment to a variable (result) and a for loop, but it is valid because the returned value is a function of two input values.
2.4 Breaking Out of a Cyclic Dependency
A concern with FRP is that it can only handle a unidirectional dependency relationship, which can be overly limiting for creating real applications. In Renkon, there are a couple of well-defined mechanisms to handle cyclic dependencies. The general idea is that the dependency graph must be acyclic, but a new value for a node may trigger updates in the dependents of the node in the next time step.
One of the most common patterns that result in a cyclic dependency is an event handler for a dynamically created DOM element from the application data. Such a handler typically affects the application data, leading to a mutual dependency.
In the program above, collection holds past timer values in an array (line 5), but when the reset event fires, the array becomes empty (line 4). The buttonDOM array consists of button elements, each labeled with a value from collection. In other words, buttonDOM depends on collection. The button also has an onClick handler that resets the array, meaning collection depends on buttonDOM via the event handler. If we try to make buttonDOM a direct dependency of collection, a cycle would form.
Borrowing the idea from Flapjax [11], we have incorporated an FRP-variation of “send” and “receiver” mechanisms into Renkon. The Events.send combinator sends a value to a receiver (in this case, reset, defined on line 1) as the onClick handler for a button. The sent value becomes available only in the next evaluation step, and collection reacts accordingly.
Another way to accommodate cyclic dependencies is to use the “$-variable” notation. When a dependency name is prefixed with a “$” sign, it tells the evaluator that this dependency should not be included when sorting the dependency graph. This effectively “defers” the evaluation of the dependent node to the next evaluation cycle.
Let us examine a concrete example. Suppose we want to build a chat interface for an LLM. When making an HTTP request to the LLM, we use the AbortController object, which is used to abort an ongoing fetch request. An LLM typically generates output slowly over time. The UI (like a chat interface) usually provides a button to abort an ongoing request.
A chat application invokes the fetch call when its dependency completionRequest is updated. After the fetch call finishes (successfully or unsuccessfully), a new AbortController instance needs to be created for the next request. We keep all responses from the LLM in an array, appending the latest response. Let us name this array responses. In this setting, responses transitively depends on abortController because fetch depends on it. At the same time, abortController must be refreshed whenever responses updates, forming a cyclic dependency.
To break the cycle, we define abortController and responses as follows:
The trigger for abortController is $responses. The dollar sign (“$”) indicates that computation occurs in the next evaluation step after responses is updated.
Note that collect itself is a way to break cyclic dependencies; the collect (or select) node depends on itself, but the updater function uses its “previous” value; thus the dependency relationship is not at the same logical time.
2.5 ProgramState
The entire program state of a running Renkon program, including the original source code of node definitions, transpiled results, the evaluation order of nodes, and current node values, is stored in an instance of a class called ProgramState. The updateProgram method on an instance takes new node definitions and updates the internal dependency graph for the next evaluation cycle.
UpdateProgram compares the new definitions with the existing ones, determines which have changed, and applies heuristics to retain existing values for nodes with the same name. The evaluate method advances the logical time and traverses the sorted list to evaluate nodes as necessary.
Creating a ProgramState instance and running updateProgram typically takes no more than tens of milliseconds. As described in Section 3, this is fast enough to use for various program analysis tasks such as dependency analysis for visualization.
3 Renkon-pad
Renkon-pad is a graphical programming environment for editing and running Renkon programs (recall Figure 1). The user can create multiple text boxes (by pressing the “code” button at the top-left) and define any number of Renkon node definitions within each text box. Additionally, the user can create isolated Renkon execution environments called “runners” (in iframes) by pressing the “runner” button.
As described in Section 2, the order of execution is controlled by dependency relationships, meaning that the order of definitions in the program text does not matter. (A historical side note: the Compel language in 1968 had this characteristic [22].) This allows the system to concatenate the contents of text boxes in any order to create a full program.
A runner window has a “run” button at the top-left corner.
When the user presses the run button, the contents of the text boxes are gathered into an array and sent to the embedded iframe using the postMessage mechanism. The receiving iframe has a ProgramState instance that handles the posted message and calls its updateProgram method (see Section 2.5).
The animation frame loop of the iframe in a runner repeatedly invokes the evaluate method of the ProgramState to run the program.
3.1 Graph Visualization
The “show graph” toggle button allows the user to enable or disable the dependency visualization.

The dependency graph visualization shows the “imported” and “exported” node names within the text box over which the user hovers the mouse pointer. In Figure 2, a text box named “Data Structure,” which contains nodes representing basic data such as windows, positions, etc., exports (shown in red) to other text boxes such as “Rendering.” Conversely, the “Data Structure” text box imports nodes (shown in blue) from “User Interaction,” including user interaction events like addCode and addRunner.
The lines in the visualization are purely informational; they do not affect the program’s behavior, nor can users manually draw them. Additionally, the visualization only shows relationships between text boxes. Its purpose is to provide a higher-level view of the program so that the user can see the meaningful program structure.
Analyzing code and determining the relationships between text boxes is implemented by creating a temporary ProgramState instance and calling its updateProgram method, which processes the code and determines the dependency relationships. The internal data structure of the ProgramState instance is accessed for visualization.
Renkon-pad is powerful enough to extend itself. The basic features to support itself consist of about 50 nodes, which, as shown in Figure 1, are grouped into six text boxes. Each box has an editable label on the title bar, allowing the user to assign meaningful names. Subsequent improvements, including infinite zoom and pan, variations in dependency visualization, commenting out a text box, and multi-touch support, have increased the total number of nodes by about another 50.
The state of the windows and the code in all text boxes can be saved to a file and later loaded back into Renkon-pad. The code in the saved file can also be read by a different startup mechanism to run it as a standalone application.
The early part of Renkon-pad development involved editing the text file (called pad.js) in a regular text editor, and loading the code onto a web page with the Renkon runtime. Once we implemented the save and load feature, we copied the contents of the text file into text boxes and saved the “pad” into a .renkon file to make the self-sustaining version. In practice, we keep the bootstrap version up to date also by copying text box content into pad.js and storing it in the same repository.
We discuss the overview of the code organization of the Renkon-pad implementation in Appendix A.

3.2 Nested Renkon-pad
We can run Renkon-pad inside of Renkon-pad. Renkon-pad’s implementation is small enough that a browser tab can create multiple nested instances and run them simultaneously, and then the nested ones can, in turn, create their own child instances.
This feature makes it easy to run and compare different variations of an application side by side, as shown in Figure 3. In Renkon-pad, users can edit code at a “child” level of instances and execute it in a “grandchild” level. A small test program can be created and refined in one instance and, once finalized, copied and pasted into another instance. This simple and generic “nesting” feature allows for various use cases without requiring predefined special-purpose features.
3.3 Renkon-pad Experiences
Through our use of Renkon-pad, we found that the simple dependency graph visualization helps reveal the larger structure of a program. By showing the graph visualization and seeing the exports and imports from and to a box, the user can see the relationships among nodes, and they can move some nodes from a text box to another to group logically connected nodes. While this does not change the behavior of the program, it helps the user to understand the code.
4 Examples
We show two examples created in Renkon-pad. Each example illustrates some interesting aspects of the language and Renkon-pad.
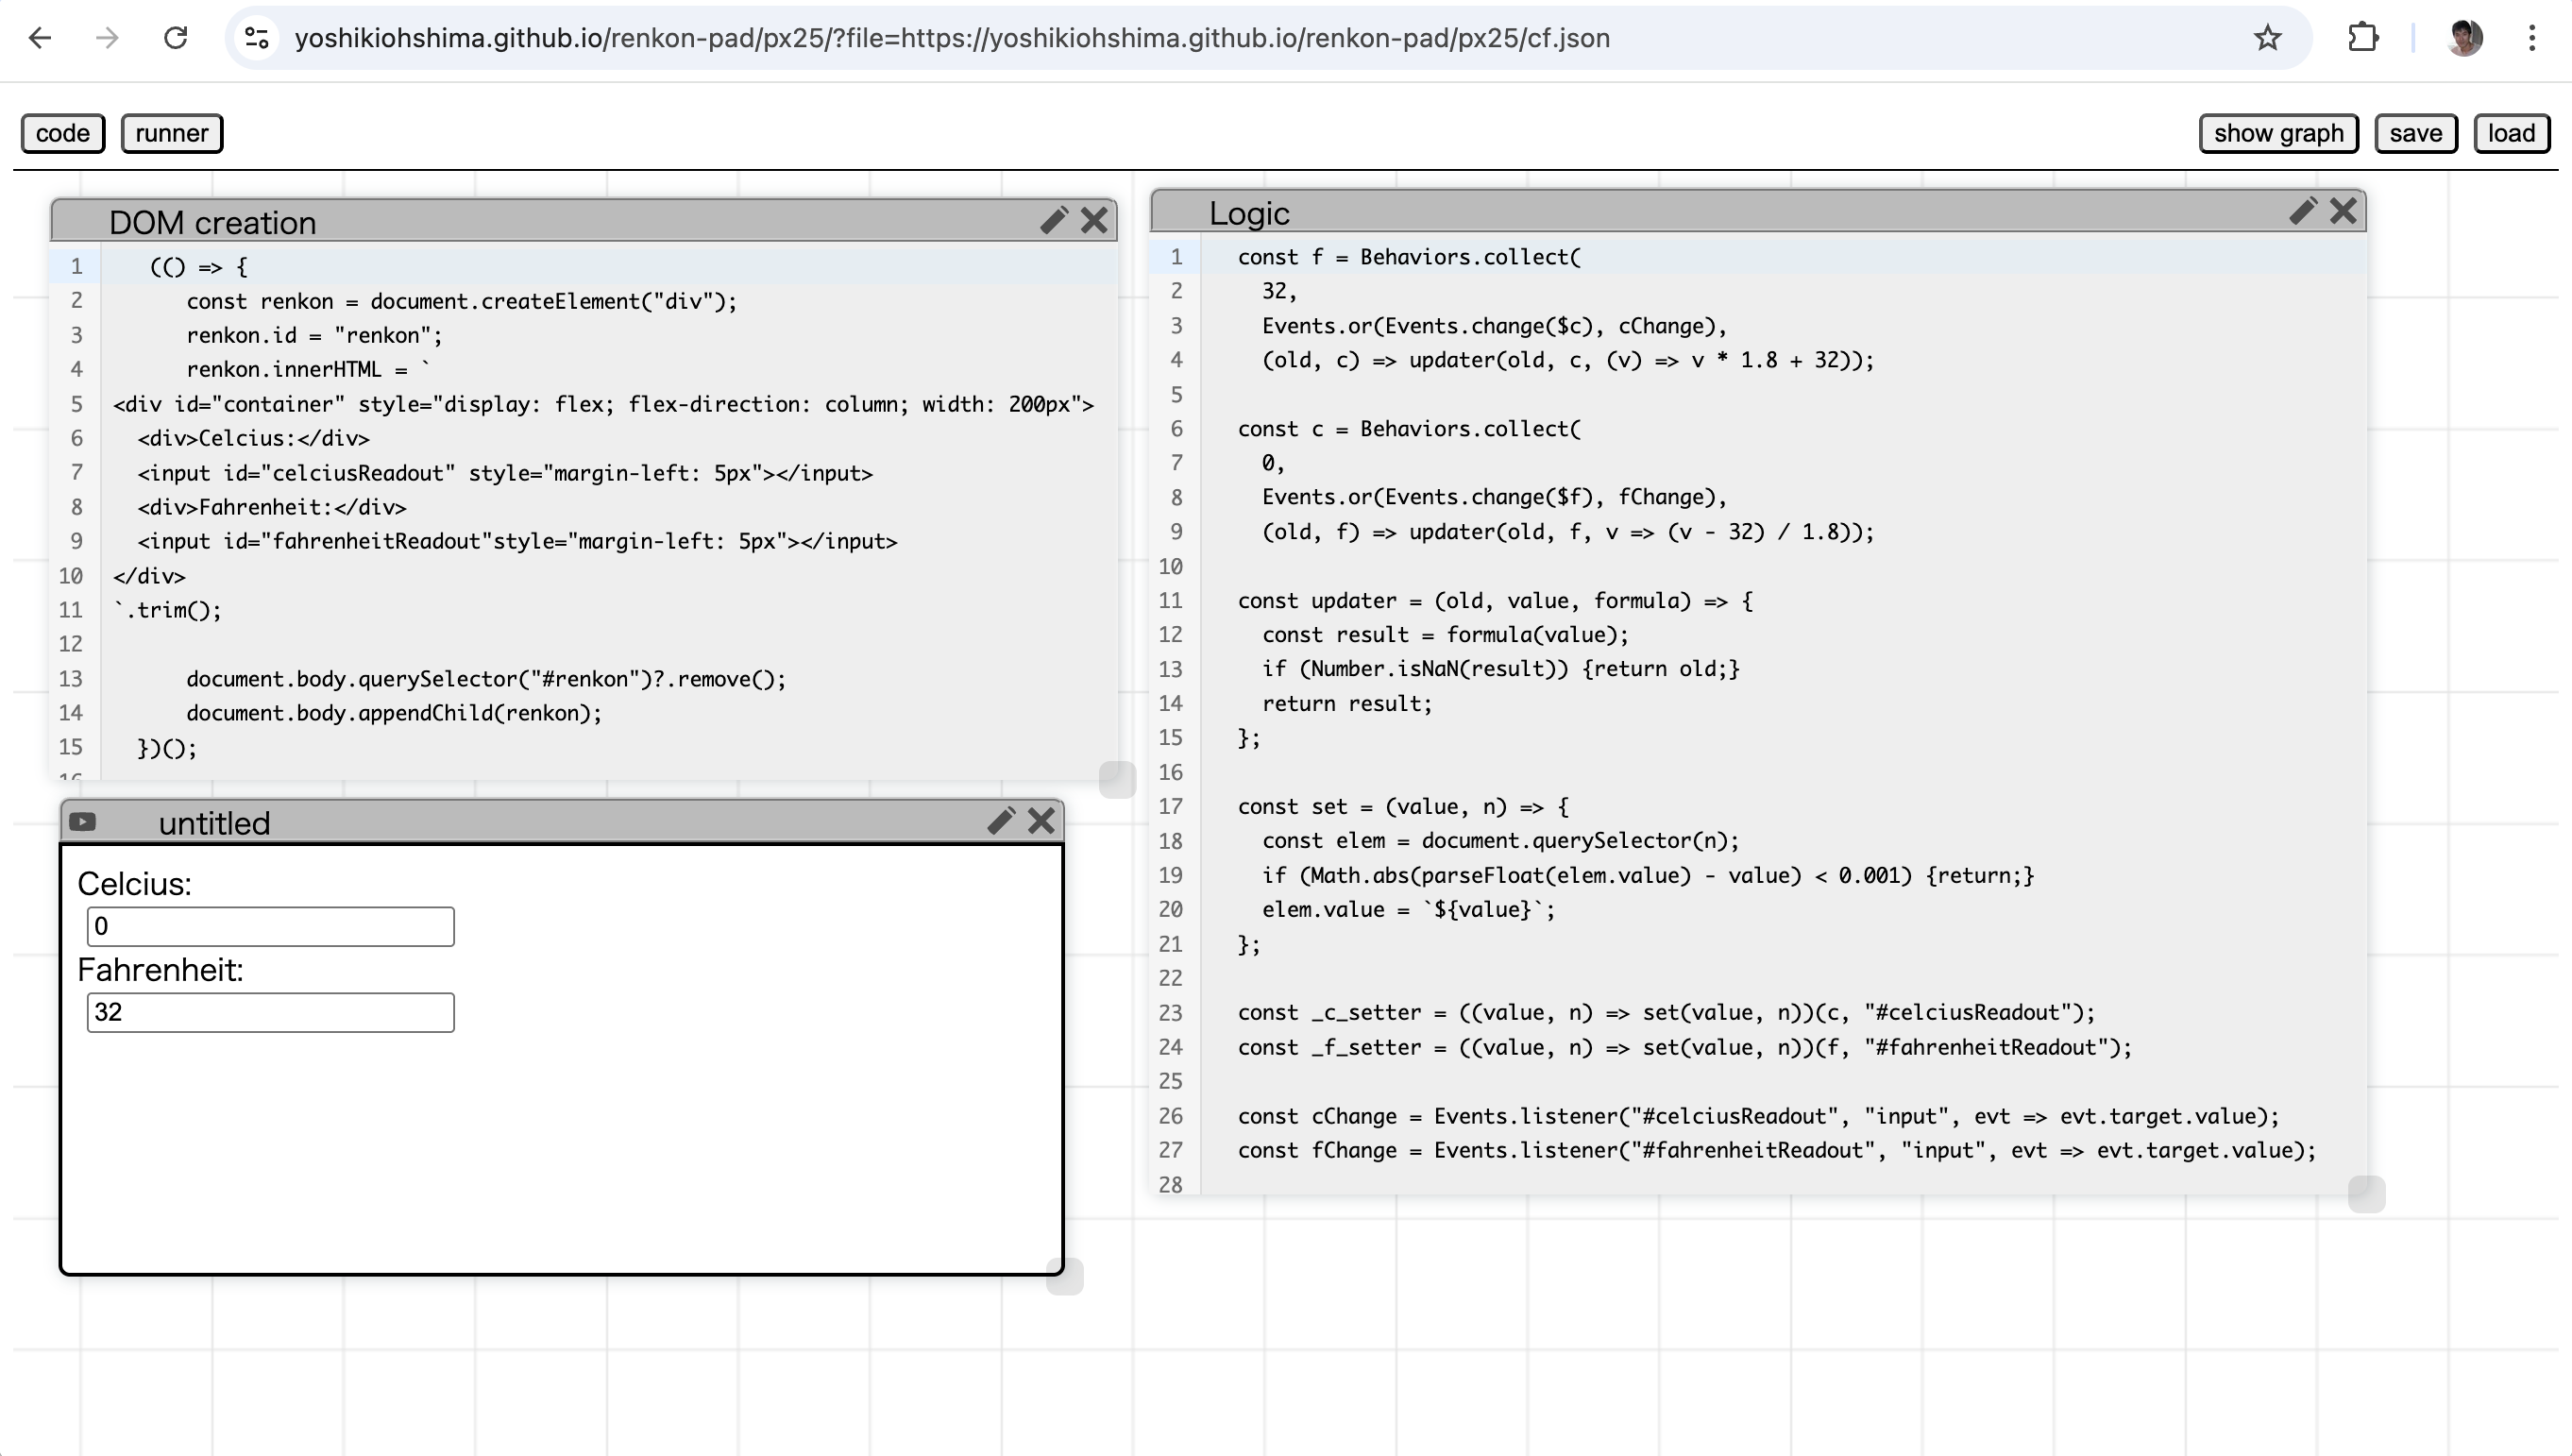
4.1 Celsius Fahrenheit Converter
In a simple Celsius–Fahrenheit converter app, we create two input DOM elements that display the temperature in Celsius and Fahrenheit. The user can edit either element, and the other element updates accordingly.
This example inherently involves a cyclic dependency in the logic, requiring a workaround to handle it properly. We start by defining the behaviors c and f in Figure 4 (lines 1–9), each representing the temperature value in one unit. The updater lines (lines 4 and 9) indicate that, when needed, the “other value” is converted using the corresponding function. The updater function simply sanitizes the arguments and computes the value.
However, c and f must be updated when their counterpart changes or when the input event occurs in one of the input elements (lines 26–27). The Events.or combinator ensures this behavior, but the $-variable is used so that changes in one field trigger an update in the next time step. Additionally, the set helper function (line 17) checks whether the value in the element is already close enough and updates it only when necessary. The runner window shows the running app in the environment.
This example demonstrates a use case of breaking a cyclic dependency. It also shows that a library like Preact is unnecessary for creating a simple application.
4.2 An LLM Chat Client
We implemented an LLM chat client in Renkon-pad. The code is available at https://yoshikiohshima.github.io/renkon-pad/px25/?file=https://yoshikiohshima.github.io/renkon-pad/px25/llama.json. You can try it if you have a client for the local Llama LLM running at the URL specified in the code (localhost:8080).
The implementation uses the AbortController mechanism described in Section 2.4. Also, to illustrate how to utilize the notion of time in the program, this client animates the tokens returned by the LLM, making them “fly” to their positions in the text from where the mouse pointer is.
The program consists of about 280 lines of code, including 60 lines of CSS and 100 lines of generator code copied from the Llama.cpp client.
5 Related Work
There have been numerous attempts to create programming environments, particularly those based on dataflow and node-and-wire diagrams. The lineage of such environments can be traced back to Bert Sutherland’s graphical language [20].
Some past dataflow environments, such as Fabrik, successfully implemented a programming tool similar to the Smalltalk code browser within a node-and-wire dataflow editor. However, Fabrik did not attempt to create the node-and-wire editor within itself.
RecipeSheet [10] leans toward providing “side-by-side” comparisons of results from running different “recipes” or program scripts. The number of nodes used in this environment is typically small.
Natto.dev introduced a 2D zoomable canvas where users can create code nodes connected with wires to represent dataflow. It allows nodes to be connected by referencing names, similar to Renkon-pad. However, Natto encourages users to create boxes on the screen to represent individual computation nodes, which suffer from the scalability issues common to traditional node-and-wire diagrams. Additionally, its implementation was not done within Natto.dev itself.
Vivide [21] is a feature-rich environment designed for quick data exploration. It is based on pipelining transformation functions. However, to the authors’ knowledge, Vivide does not model the environment within itself.
KScript and KSWorld are FRP-based graphical frameworks developed by one of the authors [15]. They successfully implemented a “universal document editor,” which combined spreadsheet, document editing, and presentation capabilities within the FRP paradigm. However, the scope was slightly more ambitious; the layout algorithm involved constraints, which are inherently multi-directional. This affected the properties of graphical elements, making the editor prone to inconsistencies in evaluation (which are technically called “glitches” in the FRP community).
The implementation strategy for FRP in Renkon closely resembles the KScript language used in the KSWorld framework. In KSWorld, changing the display tree structure (e.g., adding or removing a graphical object) altered the number of FRP nodes in the system, requiring the dependency graph to be re-sorted dynamically. This complexity, in conjunction with the attempt to accommodate multi-directional relationships, made KSWorld less practical.
In contrast, Renkon-based applications tend to offload actual visual rendering and layout processing to the browser. This comes at the cost of being unable to react to layout changes created by CSS. While this limitation could be restrictive in some cases, it seems to be a reasonable trade-off for practical applications.
6 Discussion
In this section, we discuss the lessons learned from designing the Renkon language and environment.
Using a virtual DOM while adhering to functional values means that an object like the CodeMirror text editor cannot directly participate in the reactive dependency network. That is, we cannot store a Renkon node inside CodeMirror and expect a Renkon event to fire upon an edit. This design choice appears reasonable, but in some cases, we may need to bend the rules to accommodate such external entities.
As discussed in Section 2.4, there are mechanisms to handle cyclic dependencies, such as $-variables or Events.send. However, these mechanisms can subtly break consistency if the program uses an event that triggers Events.send at the “current” logical time. Those features must be used carefully, as they remain a potential source of glitches.
Any glitch requires considerable debugging effort. While it is possible to build a dataflow engine or event-based framework without FRP or another formally structured foundation, we believe a strong theoretical foundation is crucial, even at the cost of some flexibility.
We chose JavaScript syntax primarily for pragmatic reasons. This allows us to leverage the browser’s developer console features with minimal effort and to use existing linters for Renkon code. For example, we add the “sourceURL” annotation to the transpiled code, which enables the browser to display the code in the Sources tab. You can use typical developer console features, such as setting a breakpoint.
In the long run, however, we can envision a better language designed from the ground up. At the very least, if the language allowed the definition of objects like Point and Rectangle with operator overloading, many parts of applications could be written in a more intention-revealing manner.
When integrating Promises into an FRP language, we faced the question of whether the resolved value should be treated as an event or a behavior by default. There seems to be no single correct answer. If a Promise results from an import expression, the value should be retained as a continuous value. However, if the Promise is returned from an async generator, it is more likely to trigger discrete actions rather than persist. Currently, Promises are treated as behaviors, except when returned from a generator. We may revisit this decision in the future.
The equality check described in Section 2.2 is simple and straightforward. However, when using a Map or mutable object, the programmer must wrap the Map to ensure the equality check fails when expected. One possible improvement would be a custom Map class where the set method increments a hidden counter, allowing equality checks to track updates. However, we believe that keeping the underlying mechanism simple and relying on programmer discipline is a reasonable trade-off.
Notably, using Map as a state in the popular React framework often leads to challenges in triggering recomputation and re-rendering of nested components. In contrast, the combination of Renkon and Preact works well for common patterns that involve using Map as a data structure.
The performance of applications written in Renkon is good. Renkon-pad runs at the regular frame rate (120FPS) on a modest laptop computer, even when there are hundreds of windows with CodeMirror editors, even when dragging a window quickly. When Preact virtual DOM becomes a performance bottleneck, a Renkon program can directly update DOM properties without going through the virtual DOM mechanism if necessary. Additionally, the “signal” mechanism [6] may be incorporated. There are some opportunities for tuning larger applications.
Renkon has a feature to create a “component” in terms of a new ProgramState. The new ProgramState has input node names and output node names. The user of the subgraph can instantiate a component by calling it in the following form:
These three lines mean that component is a function that creates a sub-ProgramState, and when an input (in this example, a) changes, the graph is triggered, and the output object with output values updates accordingly.
We did not use the component feature for Renkon-pad, but for building different organizations of applications, this feature is useful.
One of the authors has worked on multi-user application frameworks that were live-programmable, based on Croquet [14, 16]. While we have not yet created a multiplayer Renkon application, past work on TBAG [8] and Croquet suggests that the event-based abstraction and model-view separation concepts align well with the FRP model. For example, as long as values stored in the data structure are strictly serializable, the system could infer appropriate Croquet API calls automatically, eliminating the need for boilerplate code. This presents an intriguing direction for future work.
While Renkon supports TypeScript, we have not yet fully implemented support for tools such as an ESLint plugin and other development helpers. FRP is inherently suited to strict type checking, and the distinction between events and behaviors should ideally be enforced statically by the type checker. Enhancing the editing experience is part of our future development plans.
7 Conclusion
We have implemented an FRP-based language called Renkon and a graphical programming environment that supports live programming and side-by-side comparisons for program exploration. Notably, the environment is powerful enough to modify and improve itself.
The authors thank Ted Kaehler and John Maloney for their valuable suggestions on the early version of the paper. The authors also thank the reviewers for their insightful and thorough comments and suggestions.
References
- [1] Rick Bitter, Taqi Mohiuddin, and Matt Nawrocki. LabVIEW: Advanced programming techniques. Crc Press, 2006.
- [2] Blender. Node-based scripts in Blender. URL: https://docs.blender.org/manual/en/latest/modeling/geometry_nodes/fields.html.
- [3] Adam Bouhenguel. Project substrate. URL: https://projectsubstrate.org/.
- [4] Cycling ’74. Max. URL: https://cycling74.com/products/max.
- [5] Evan Czaplicki. A Farewell to FRP, 2016. URL: https://elm-lang.org/news/farewell-to-frp.
- [6] Rob Eisenberg and Daniel Ehrenberg. JavaScript Signals standard proposal. URL: https://github.com/tc39/proposal-signals.
- [7] Conal Elliott and Paul Hudak. Functional reactive animation. In Proceedings of the Second ACM SIGPLAN International Conference on Functional Programming, ICFP ’97, pages 263–273, New York, NY, USA, 1997. Association for Computing Machinery. doi:10.1145/258948.258973.
- [8] Conal Elliott, Greg Schechter, Ricky Yeung, and Salim S. Abi-Ezzi. TBAG: a high level framework for interactive, animated 3d graphics applications. In Dino Schweitzer, Andrew S. Glassner, and Mike Keeler, editors, Proceedings of the 21th Annual Conference on Computer Graphics and Interactive Techniques, SIGGRAPH 1994, Orlando, FL, USA, July 24-29, 1994, pages 421–434, New York, NY, USA, 1994. ACM. doi:10.1145/192161.192276.
- [9] Dan Ingalls, Scott Wallace, Yu-Ying Chow, Frank Ludolph, and Ken Doyle. Fabrik: a visual programming environment. SIGPLAN Not., 23(11):176–190, January 1988. doi:10.1145/62084.62100.
- [10] Aran Lunzer and Kasper Hornbæk. RecipeSheet: creating, combining and controlling information processors. In Proceedings of the 19th Annual ACM Symposium on User Interface Software and Technology, UIST ’06, pages 145–154, New York, NY, USA, 2006. Association for Computing Machinery. doi:10.1145/1166253.1166276.
- [11] Leo A. Meyerovich, Arjun Guha, Jacob Baskin, Gregory H. Cooper, Michael Greenberg, Aleks Bromfield, and Shriram Krishnamurthi. Flapjax: a programming language for Ajax applications. SIGPLAN Not., 44(10):1–20, October 2009. doi:10.1145/1639949.1640091.
- [12] Jason Miller. Htm (hyperscript tagged markup). URL: https://github.com/developit/htm.
- [13] Yoshiki Ohshima. Renkon-Core: An FRP Evaluator. URL: https://github.com/yoshikiohshima/renkon.
- [14] Yoshiki Ohshima, Aran Lunzer, Jenn Evans, Vanessa Freudenberg, Brian Upton, and David Smith. An experiment in live collaborative programming on the Croquet shared experience platform. PX 22, 2022.
- [15] Yoshiki Ohshima, Aran Lunzer, Bert Freudenberg, and Ted Kaehler. Kscript and ksworld: a time-aware and mostly declarative language and interactive gui framework. In Proceedings of the 2013 ACM International Symposium on New Ideas, New Paradigms, and Reflections on Programming & Software, Onward! 2013, pages 117–134, New York, NY, USA, 2013. Association for Computing Machinery. doi:10.1145/2509578.2509590.
- [16] Yoshiki Ohshima, Aran Lunzer, Vanessa Freudenberg, Brian Upton, and David Smith. Live programming and text editor integration in the Croquet Microverse 3d collaborative construction system. LIVE 22, 2022.
- [17] Marc Pouzet. Lucid Synchrone, version 3. Tutorial and reference manual. Université Paris-Sud, LRI, April 2006.
- [18] Preact. Preact. URL: https://preactjs.com/.
- [19] React. React. URL: https://react.dev/.
- [20] William Robert Sutherland. The on-line graphical specification of computer procedures. PhD thesis, Massachusetts Institute of Technology, 1966.
- [21] Marcel Taeumel, Bastian Steinert, and Robert Hirschfeld. The vivide programming environment: connecting run-time information with programmers’ system knowledge. In Proceedings of the ACM International Symposium on New Ideas, New Paradigms, and Reflections on Programming and Software, Onward! 2012, pages 117–126, New York, NY, USA, 2012. Association for Computing Machinery. doi:10.1145/2384592.2384604.
- [22] L. G. Tesler and H. J. Enea. A language design for concurrent processes. In Proceedings of the April 30–May 2, 1968, Spring Joint Computer Conference, AFIPS ’68 (Spring), pages 403–408, New York, NY, USA, 1968. Association for Computing Machinery. doi:10.1145/1468075.1468134.
Appendix A Renkon-pad Code
The nodes that implement Renkon-pad are grouped into six text boxes. We explain some of the nodes below.
A.1 Initialization
A web-based Renkon program that uses Preact typically requires some application-specific DOM elements as the “root” of virtual DOM elements. These DOM elements must be dynamically added to the runner’s iframe when the program starts. The “Initialization” text box contains a function that creates these elements if necessary and appends them to the iframe’s document.
A.2 Data Structure
Fundamentally, the application state of Renkon-pad is a list of windows. A Renkon-pad window has properties such as position, type (either “code” or “runner”), and title (e.g., “Initialization”). One could imagine creating a “window” object that packages properties like “position” and “title.” However, we found that a better organization for a Renkon program is to maintain separate collections for each property. It is analogous to adding a new column in a spreadsheet for a new property for windows; a “row” that shares the same ID represents a single window’s data. In this way, the program can avoid mutation in deeply nested objects and allow different downstream actions to react to different property updates.
Following this approach, the “Data Structure” text box has definitions of several collections. The fundamental windows array holds only the IDs (strings) of windows, while additional data structures such as positions and titles are Map objects, keyed by window ID.
The definition of windows looks like this:
The above definition means that windows starts as an empty array ([]). When the loadRequest event occurs (triggered when the user presses the load button and selects a file), the event carries the loaded data, which contains data.windows. That value is used as the new value of windows. When the newWindowRequest event occurs, containing the ID and type (“code” or “runner”) of a new window, the new ID is added to the array.
The Renkon-pad implementation has a node called newId, similar to newIdRequest in Section 2.1. As shown below, the newWindowRequest event is a dependent of newId:
This creates a new object with id and type properties as an event.
windowTypes is a Map, keyed by window ID, and holds the type (“code” or “runner”) of each window.
The loadRequest and newWindowRequest cases of windowTypes are straightforward. The last Events.change(windows) case is written in anticipation of future scenarios where multiple windows may be deleted or added simultaneously. However, at present, it is triggered primarily when a single window is removed, making the windows array one entry shorter.
The positions variable is a Map, keyed by window ID and holds an object in the form x, y, width, height. While we could create four Maps to store x, y, width, and height separately, we instead treat the object as an immutable Rectangle that encapsulates these four values.
The trigger windowTypes could have been windows. However, we want to assign different widths and heights to newly created windows based on their type, so we react to changes in windowTypes to make it explicit, instead of using windows with windowTypes as a free variable. The topological sorting of dependencies guarantees that windowTypes has a consistent value with windows when positions’ trigger is examined, ensuring that we can safely select an appropriate input.
A.3 Rendering
The data structure in Renkon-pad is displayed on-screen using Preact’s virtual DOM mechanism. The virtual DOM hierarchy is generated as a value from the data structure. The windowDOM function creates a tree for a window:
This function takes the properties of a window and returns an h object. (Preact’s h takes arguments in the common JS-level virtual DOM library, as shown above, while html, explained in Section 2, accepts a template string. Both create Preact virtual DOM elements.)
One interesting detail is the ref callback. The content of a window consists of either a CodeMirror text editor or an iframe, which cannot be represented as virtual DOM elements. Instead, these objects are created separately and appended to the actual DOM element when ref becomes available.
The windowDOM function is called from a node named windowElements:
The function in the windowElements node calls windowDOM for each entry in the windows array with the necessary properties. The resulting element (the class="owner" element) is then rendered using the render function.
A.4 User Action
The logic for interacting with a window is implemented as a time-varying callback function. In an application like Renkon-pad, the response to a pointer move event depends on the history of previous actions. If the last pointer down event occurred on the title bar of a window, the pointer move event is interpreted as a drag operation. If it occurred on the resize handle, the pointer move event corresponds to a resize action. When a pointer up event happens, pointer movements no longer trigger actions.
We create a node that holds either a function or null, named moveCompute:
The moveCompute value updates when a pointer down event occurs on a pointer-sensitive DOM element and becomes null when a pointer up event happens.
moveCompute is used by a node with the Events.listener combinator:
The Events.listener combinator resembles the standard addEventListener, but it reacts to argument changes. When the handler function changes, the existing handler on the DOM element is removed, and the new handler is added. If the argument is null, the existing handler is removed without adding a new handler.
This design allows a single pointermove handler for the container of all windows (the pad element), yet the event listener for pointermove changes accordingly.
Although one could assign a separate set of event handlers to each window DOM element, FRP favors this kind of “switch” based on functions as time-varying values.
A.5 Others
Additional text boxes include “Save and Load,” “CSS,” “User Interaction,” and “Graph Analysis,” each containing a set of node definitions. They can be examined in the URL shown at the beginning of the paper.