Stepwise Source, a Supporting Tool for Source Code Demonstration

Abstract
The difficulties in teaching and learning computer programming remain a pressing issue to this day. Several studies and tools have been developed over the years to tackle this challenge from many different points-of-view. One of the biggest tools an educator has to support him in a classroom is the progressive explanation of how a source code is constructed and what effects each of its parts has on the overall result. Attempts to translate this live-directed tool to an on-line experience is usually time-consuming and lacking in features. In order to tackle this concern, a tool to create piecewise source code writing demonstrations was developed – Stepwise Source. The main idea behind this application is to allow step-by-step explanation of a source code construction, along with any relevant annotations and automatically assessed challenges that an educator may add. By providing a dynamic platform for both students and lecturers, this software aims to improve the teaching and learning of computer programming, while trying to imitate the information flow of a live lecture, with the added benefit of student-directed pace of explanation. Through interactive guidance and automated assessment, this tool has the potential to foster a deeper understanding of computational principles and promote proficiency in programming skills.
Keywords and phrases:
Computer Programming Education, Source Code Demonstration, Education TechnologyCopyright and License:
2012 ACM Subject Classification:
Applied computing Interactive learning environmentsFunding:
This work has been supported by FCT – Fundação para a Ciência e Tecnologia within the R&D Units Project Scope: UID/00319/2023. The work of Alvaro was supported by national funds: UID/05757 - Research Centre in Digitalization and Intelligent Robotics (CeDRI); and SusTEC, LA/P/0007/2020 (DOI: 10.54499/LA/P/0007/2020)Editors:
Jorge Baptista and José BarateiroSeries and Publisher:
1 Introduction
Teaching computer programming presents several challenges. On the educator’s side, issues can arise from choosing an inappropriate programming language, focusing too much on the language itself rather than fostering computational thinking, or failing to tailor their teaching methods to meet the diverse needs of learners. [12, 3, 4, 9] From the student’s perspective, difficulties may stem from a lack of foundational skills, such as weak mathematical or abstract thinking abilities, or trouble interpreting and breaking problems down into smaller, manageable tasks. [1, 9, 4, 16] Additionally, students often face challenges related to motivation and persistence, including giving up early when encountering initial obstacles or struggling to develop autonomy in their learning process. [12, 2, 17, 1]
In order to address some of the identified challenges, various programming education tools have been developed:
-
Source code animation tools, as PythonTutor [10], help students visualize how code executes, improving their ability to grasp abstract concepts and increasing independence in learning;
Additionally, there are tools that fall into the category of source code demonstration. These are designed to support students in writing code by providing partially completed templates that they must finish. Khan Academy [11] features a solution along these lines in its exercises section. This approach not only fosters autonomy and offers a more hands-on learning experience, but it may also aid students in learning the process of computational thinking by helping them understand how to break down problems into smaller parts, thus boosting motivation.
This paper is divided in six sections: after this introduction, Section 2 presents the main ideas and concepts behind Stepwise Source. Section 3 introduces Stepwise Source’s Domain-Specific Language (DSL) that supports the functioning of the entire application. Section 4 refers to the main technologies and techniques that were employed to build Stepwise Source. Section 5 shows how the application can be used and presents the feedback obtained from future programming educators. Finally, Section 6 finishes the paper with an overview and proposals for future improvements and projects.
2 Stepwise Source, Proposal
Stepwise Source, accessible at http://stepwisesource.epl.di.uminho.pt, finds a new path among the existing tools, by allowing educators to create piece-wise demonstrations of how a source code is written. By adding comments and alternate paths of explanation, teachers are able to construct complex explanations in an accessible form, that students can navigate on their own pace. Overall, it aims to simulate the explanation and construction of source code in a progressive manner, similar – albeit not identical – to a live demonstration. The main difference relies on the fact that a student itself will determine its rhythm by controlling the progression or regression of steps according to his or her preferences.
In order to do so, the system requires input from the educator in the form of a presentation. This presentation consists in a sequence of slides that contains the source code, whose construction will be demonstrated and explained to the student, and annotations to this source code that will offer guidance to the student on how to carry out said construction. This source code can be annotated with specific commands that define how the presentation will unfold, detailing annotated explanations, possible variations, and even questions for the students.
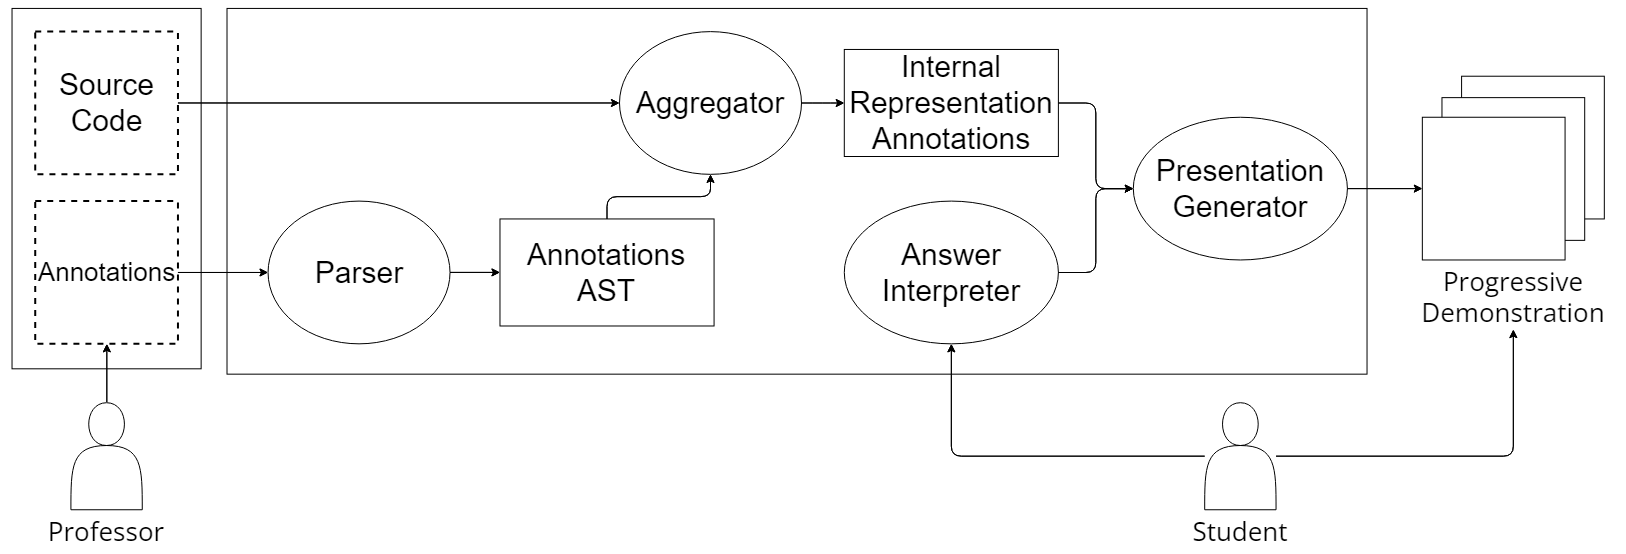
The overall system architecture is depicted in Figure 1. As can be seen, the source code whose construction is demonstrated is not parsed per se, only Stepwise Source’s commands are processed. The results generated by the parser are compiled into an internal representation that, in turn, is stored in a database for quick construction of the navigation web page. The student interacts with the system both by navigating through the presentation, and by answering exercises that might be added to the slides.
3 Stepwise Source, DSL
A DSL with a syntax similar to that of LaTeX, named Stepwise Language, was designed specifically for Stepwise Source. The syntactical similarity to LaTeX was chosen for its wide use among computer programming teachers for document preparation. It aims to facilitate teachers’ presentation input, allowing for all features to be accessible through simple text.
3.1 Overview and Use
Stepwise Language was designed to empower educators in teaching computational thinking and programming through the creation of interactive and visually appealing presentations. Central to this DSL are several commands that provide educators with the tools to structure their lessons, style what is covered, integrate interactive components, and regulate the information flow. This section provides a detailed exploration of these commands, including their syntax, components, and practical applications.
3.1.1 Defining a Slide
At the core of any presentation crafted using this DSL lies the concept of a slide, an essential element that encapsulates both structure and content (see Listing 1 for its declaration syntax). Its creation begins with the \slide command to define a new slide. Each slide is designated by a unique identifier (ID) that facilitates reference throughout the presentation, ensuring that content is organized and coherent.
The title of the slide, represented by the TITLE parameter, provides a succinct overview of the slide’s focus. It sets the stage for the audience, offering a glimpse into the topic being addressed. Complementing this, an optional description can be included through the \description command, adding an extra layer of context and allowing for detailed explanation of the slide. This description elaborates on the content, helping the audience to better understand the significance of what they are about to learn.
In order to encapsulate the main content of the slide, the \begin and \end commands create a block where the primary material resides. This content can consist of various elements, including code snippets, explanatory annotation text, and exercises that can be evaluated through regular expressions. The ability to insert diverse types of content within this structure allows educators to tailor their presentations to suit different teaching styles and student needs.
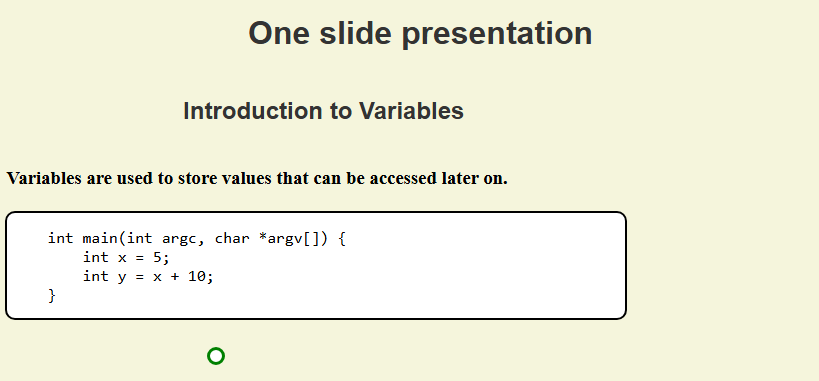
As a running example for the rest of this section, a slide designed to introduce the concept of variable declaration in computer programming using the C language is presented in Listing 2. In this example, the slide (whose ID is Intro) begins with a clear title that indicates its purpose (Introduction to Variables), while the description succinctly explains the function of variables in programming. The block of content then demonstrates the concept with concrete examples, thereby supporting student comprehension. The rendering of this slide can be seen in Figure 2.
3.1.2 Styling
In addition to the foundational structure of slides, the visual presentation of content plays a vital role in effective communication. To enhance the clarity and appeal of presentations, the DSL offers two distinct commands that specify visual styles for annotations: \newreactive and \newfixed. Both commands have the essential function of defining custom styles which can be applied to the content’s annotations, giving educators a versatile way of enhancing the visual appearance of their presentations. They ensure that particular aspects of the presentation stand out and call attention to important information by establishing specific styles. These instructions contrast in how and when they deliver the styles to the audience, even though they both aim to improve content presentation.
The \newfixed command ensures that the applied styles are visible at all times, providing immediate and constant context to the audience. This approach is useful in scenarios where frequent reference to important information is necessary, offering a stable and predictable presentation experience.
On the other hand, the \newreactive command introduces a dynamic element by revealing styles only upon user interaction, such as hovering or clicking on an element. This feature reduces initial visual clutter, creating a more simplistic experience. It is particularly advantageous when a gradual reveal of information is desired, allowing educators to control the pacing of content delivery.
The syntax for defining these styles is presented in Listing 3. In both declarations, ID serves as the identifier for each styling command definition, allowing it to be referenced throughout the presentation for consistent application. The KEY and ATTRIBUTE components consist of a set of CSS-like styling rules that can encompass various attributes such as text colour, font weight, and other visual properties that contribute to the overall aesthetics of the content111The list of keys and attributes is presented in Subsection 3.1.3, Table 1..
To illustrate the application of these commands, Listing 4 adds them to the running example of Listing 2. The highlight style (applied on line 8 via the \highlight command) emphasizes key information using green and bold text, while the removed style (line 9, via \removed) can effectively signal to students which elements have been removed from prior discussions with a red colour and strike-through effect. It is important to note that the explanations for each styled annotation is given as a second parameter for each of the style commands. The slide for this example can be seen in Figure 3. Teachers can also define macros that use a style and a fixed message to avoid repetition when creating slides, such as demonstrated by Listing 5. The Error command is an example of a macro that can be used throughout the presentation, with the message already defined. Whereas, with the Remove Style command, the message needs to be defined each time it is used.
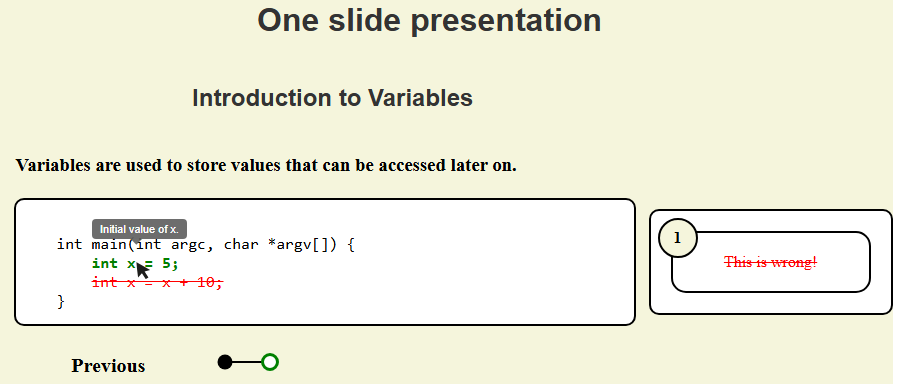
Such visual distinctions serve to guide students’ attention to significant aspects of the material, akin to what a teacher would do while explaining a snippet of code in class.
3.1.3 Styling Keys
Stepwise Source’s DSL employs a CSS-like syntax for defining styles. This familiar structure assists educators who may have prior experience with web development, allowing them to focus on content creation rather than navigating complex formatting rules. Educators can apply colours through specific attributes such as text-color, background-color, and border-color. The colours themselves can be specified either by their common names (e.g. red, green, and blue) or by hexadecimal codes in the standard format #RRGGBB.
| DSL | CSS Equivalent | Description |
|---|---|---|
| text-color: red | color: red | Changes the text color to red, drawing attention to highlighted text. |
| background-color: blue | background-color: blue | Sets the background color to blue, useful for emphasizing sections. |
| border-color: #FA0C25 | border-color: #FA0C25 | Defines the color of an element’s border as a specific hex code, highlighting areas effectively. |
| bold | font-weight: bold | Highlights key terms or code for emphasis. |
| strikethrough | text-decoration: line-through | Visually indicates removed or outdated content. |
| underline | text-decoration: underline | Can be used to underscore important points or warnings. |
| text-style | font-style | Applies styling to text, with options for italic and oblique for emphasis or differentiation. |
| text-size: 16 | font-size: 16px | Sets the font size of the text, allowing for adjustments in readability. |
| text-align: center | text-align: center | Aligns the text to the centre of the element, useful for headings or important messages. |
Table 1 provides a comprehensive overview of the DSL’s styling keys and attributes, illustrating how they correspond to standard CSS properties. The syntax chosen was not CSS but a similar one because the DSL could not allow for all of CSS symbols.
3.1.4 Exercises
A distinctive feature of this DSL is its ability to stimulate student engagement through the \exercise command, whose syntax is shown in Listing 6. This command creates interactive elements within the presentation, fostering active participation and self-assessment among students.
In this syntax, REGEX is a regular expression222JavaScript standard https://www.w3schools.com/jsref/jsref_obj_regexp.asp, to be defined by the tutor, that automatically validates the input provided by the student, ensuring the accuracy of their responses. The PROMPT serves as the exercise’s statement that is presented to the student, guiding their interaction and prompting them to reflect on the content of the presentation.
In order to illustrate the application of interactive exercises, consider the example in Listing 7, which allows for immediate student feedback. In this instance, the command:
\exercise{/[0-9]+/}{Complete the code...}
prompts students to input a valid number, checking their response against the specified regular expression. This interactivity not only enhances student involvement but also enables them to self-assess their understanding in real-time.
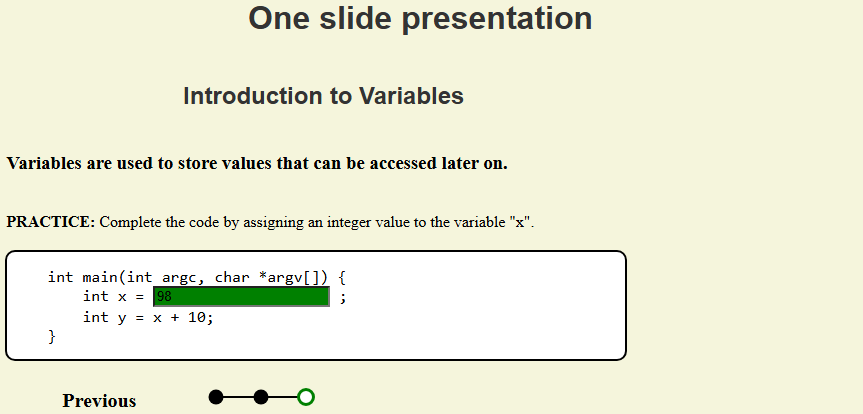
Interactive exercises foster an engaging learning environment, allowing students to test their comprehension and receive immediate feedback based on their inputs. Such features not only promote active learning but also encourage students to engage more deeply with the material, ultimately enriching the overall educational experience. An example of an exercise correctly answered (green background indicates a correct answer, red a wrong one) can be seen in Figure 4.
3.1.5 Presentation Flow
Controlling the flow of the presentation is essential to effectively convey information. The mandatory \order command enables this by allowing educators to dictate the sequence of slides, thereby creating dynamic, ans possibly branching paths that are tailored to their audience’s needs.
Listing 8 shows the syntax of the \order command. SLIDE_LIST represents the list of identifiers that dictates the order in which the slides will be presented. It is specified by a comma-separated list of slide IDs. A fork feature allows educators to create branches in the presentation using the pipe operator (|), enabling alternative paths for the flow of explanation. This would be used in cases which a topic demands not only demonstration of correct implementation, but also incorrect ones. Another possible use for the fork feature is the explanation of alternatives to one topic, such as the different repetition primitives in a language that can be used to implement loops.
Listing 9 illustrates the functionality of the \order command. It defines a presentation flow that starts with the slide Intro, followed by Variables, where the presentation can diverge to either provide examples (Examples) or conduct a quiz (Quiz). Finally, the paths merge and concludes the presentation with the slide Conclusion. The actual navigation graph can be seen in Figure 5. By utilizing the \order command, educators can effectively manage the presentation’s flow, ensuring that content is delivered in a manner that is both engaging and responsive to the students’ dynamics.

3.2 Formal Definition
An Extended Backus-Naur Form (EBNF) grammar was written333The source code for the whole project including the language can be found here: https://github.com/Yakari144/StepwiseSource in order to capture the syntax and structure required for Stepwise Language’s specialized commands444More specifically, the grammar was written in Lark’s dialect for EBNF in order to both design and implement the parser.. This section provides a detailed analysis of each production rule within the EBNF, starting with the overall structure of the language and proceeding through the components of each command, including slides, style definitions, macro declarations and presentation order.
The EBNF definition for Stepwise Language begins with the required start production rule, as seen in Listing 10. This initial rule is defined as a list of commands, including slide definitions (line 3), style (lines 4 and 5) and macro (line 6) declarations. After all the commands are set, the presentation order is defined.
The slide command has three main components, represented by non-terminal symbols: slide, description (optional), and code_block. The slide non-terminal rule, shown in Listing 11, maps to the slide command with an identifier and a title. The slide keyword is defined in both Portuguese and English555All keywords are defined in both languages. Identifier, by their own nature, can be written in any language that uses the English alphabet. (line 2), while the slide identifier follows typical identifier syntax: a letter followed by alphanumeric characters (line 3). Titles use the TEXT terminal symbol (line 4), which matches either escaped curly brackets (\}) or any character with the exception of a closing curly bracket.
The description command, shown in Listing 11, uses the same TEXT terminal for specifying text content. The code_block command, meanwhile, encapsulates content within BEGIN and END keywords, as shown in Listing 11.
Inside a slide’s content, it is possible to include both source code (in any programming language language) and Stepwise Language commands. The EBNF rule for content, shown in Listing 13, includes three commands. The first is the EXERCISE command, which accepts a regular expression (REGEX, defined on line 6) and a text value (line 3) as arguments. The NOT_END commands (lines 4 and 5) are declared to ensure that commands do not accidentally signal the end of the slide, as would happen if their identifiers were end. Instead, by using the terminal NOT_END, these command definitions operate within the slide’s content without triggering its conclusion.
Source code, defined by the CODE terminal, supports any kind of character and escaped symbols that are preceded with backslash (\). It is designed to allow for the use of any programming language, even those that require characters that are reserved for Stepwise Language, such as open and close curly brackets, and backslash itself. The listings in Section 3 that contain a running example of slides with a source code written in C show that, in order to use curly brackets to open and close C’s blocks of code, it is necessary to escape them with backslash (\{ and \}). This strategy, very common in other languages, even allows the use of Stepwise Language source code inside itself, as the content of a slide666In a similar fashion to programming languages bootstrapping..
The nreactive and nfixed rules, detailed in Listing 14, share a similar syntax and only differ by their keyword. They define a unique identifier followed by a list of CSS-like styling rules, each separated by a semicolon.
The macro rule (Listing 15) is defined similarly to the other command rules, but without a specific keyword. The MACRO terminal captures identifiers that do not conflict with the other command keywords using a negative lookahead to avoid them. The remaining syntax aligns closely with that of the other commands.
The final command rule defined in the Stepwise Language’s EBNF, order, is shown in Listing 16. This command uses a hierarchy of productions to handle command ordering and prioritization. The recursive structure self-manages precedence: parentheses and identifiers are evaluated first, followed by the pipe operator (|) and then commas, as the lowest priority.
4 Stepwise Source, Development
The selection of programming languages and tools for building Stepwise Source was crucial to lay a strong foundation for the system. Python [15] was chosen due to its flexibility, ease of use, and the wide range of libraries available. Among these libraries, Lark was selected for its ability to easily and rapidly construct a parser suited for Stepwise Language.
The implementation of Lark’s Interpreter module enables a customized parsing process tailored to the needs of the DSL. Beyond basic command interpretation, the Interpreter class traverses the Abstract Syntax Tree (AST), handling each node to build the core data structures required by the parser, while ensuring efficient communication with the database. The Interpreter class includes key properties for managing data that is essential to Stepwise Source’s functionality, including commands and slides declarations, the current slide’s identifier and content, and the order structure.
Beyond its internal properties, the Interpreter class also implements methods for each of the non-terminal symbols in the grammar. Beginning with the annotation style declarations, in order to convert the CSS-like syntax of the Stepwise Language into CSS by iteratively processing each token and adding the appropriate CSS formatting.
The presentation order command is handled by the functions responsible for storing the order of the presentation and parsing the slide order expression declared inside the \order command parameter. Since the operator precedences were structurally defined in the EBNF 777These precedence rules are almost identical to usual arithmetic precedence definitions in regular programming languages., the interpreter only has to collect and store the data. It checks each token, determining whether it represents a stopping point or a recursion case, structuring the data accordingly.
Every time a slide declaration is parsed, a new slide object is created and set as the current one. The Interpreter then iterates through the slide’s contents, populating the slide object with properties. The annotated source code inside the slide’s content is translated into HTML in order to style it accordingly, with each exercise command converted to an input text box.
4.1 Database
Given the importance of managing and retrieving complex data, choosing a suitable database was essential. MongoDB [14], a document-based database, was selected for its flexibility in handling the structured data generated by the parser.
In order to effectively organize the parsed data structures within MongoDB, the database system is divided into three collections: presentations, annotations, and orders. Each collection plays a specific role in managing the structured information resulting from Stepwise Language’s parsing.
The presentations table stores presentations that contain an identifier, a name, the original text input used to generate the presentation, and a list of processed slides. Each slide within a presentation includes its identifier, title, description, generated HTML code, a list of annotation identifiers, and a list of exercises, where each exercise entry specifies its identifier, assessment regular expression, and question.
In the annotations table, each entry represents the annotations linked to a specific presentation. This table includes the presentation identifier it refers to, alongside a list of annotations. Each annotation entry has an identifier and a category attribute, classifying it as either a "command" or "macro". Entries in the "command" category also include a type and a list of styling attributes, while those in the "macro" category contain the command that created it and the associated text.
The final table, orders, holds the structural order of each presentation. Each order entry includes the presentation identifier and an order string that defines the slide arrangement, such as:
which, organizes slides by identifier. Nested lists in the order string represent forks, with each path in a fork following the same syntax as the main order. This organization allows each path to be processed as an independent presentation structure.
4.2 Backend
The backend serves as the intermediary layer, managing communication between the frontend, the parser, and the database. Built with JavaScript [7] and Express.js [8], the backend efficiently handles requests and processes data, whether it involves retrieving stored content from MongoDB or sending commands to be processed by the Python-based parser. This architecture enables the frontend to dynamically interact with the system, providing the necessary content to users without delays or inconsistencies.
4.3 Web Application
The frontend was developed with Create React App [5] due to its simplicity and efficiency. React’s component-based architecture made it easier to manage dynamic content and consistency throughout the application. This framework allows the Web App to render and update the learning materials in real time, providing an interactive experience for users. The web application is divided into six pages: Home, About, Documentation, Presentation List, Presentation Editor, and Presentation Navigator, which will be presented in the next section.
5 Stepwise Source, Use and Feedback
Stepwise Source is comprised of different pages that implement several aspects of the application. The main operating pages are the presentations list, editor and navigator.
5.1 Presentations List Page
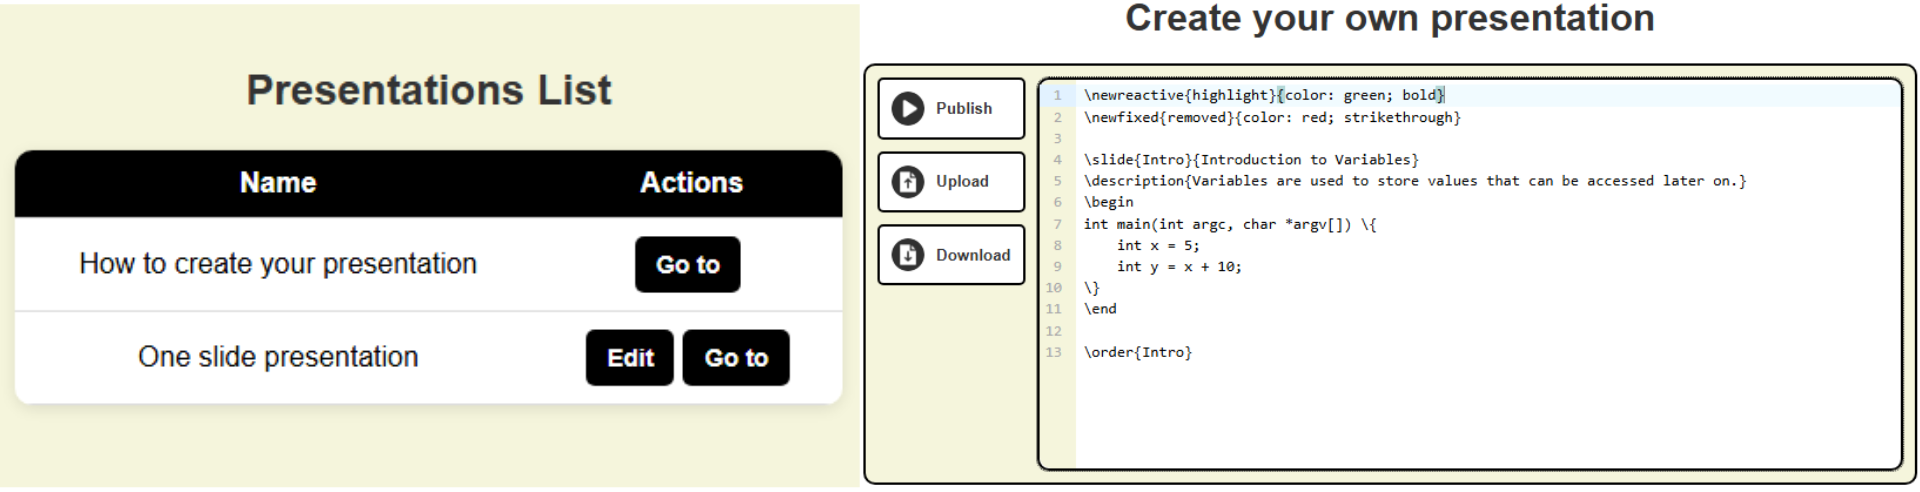
The presentations page (left side of Figure 6) was designed to showcase all presentations created on the platform. The first row is reserved for the tutorial presentation. Since this tutorial is not intended for user modification, only a “Go To” button is available, preventing any edits. This “Go To” button serves as a redirect, guiding users to the respective presentation page. For all other presentations, besides “Go To”, an additional “Edit” button is available, allowing users to modify the presentation content.
5.2 Presentation Editor Page
A large text box serves as the editor, allowing users to directly input the code needed to build their presentations (right side of Figure 6).
An “Upload” button opens a file explorer, enabling the user to select and load a file with pre-existing code. To support users who may wish to save their progress locally, a “Download” button is also available. This function instantly downloads the current content of the text editor as a file named “presentation.txt”.
Once the presentation code is finalized, users can click the “Publish” button to publish their presentation. This action opens a panel for naming the presentation, making it easier to find later. The panel prompts for a name and displays any input or naming errors, guiding the user to make necessary corrections before publishing. If the page was accessed to edit an existing presentation, clicking “Publish” will update it instead of creating a new one.
5.3 Presentation Navigator Page
The central feature of Stepwise Source is the Presentation Page, where each slide in a presentation is displayed along with its source code, descriptions, annotations, styling, and unique navigation options. Figures 2 to 5 already showed the presentation navigator in use for the running example of Section 3.
Besides what has already been demonstrated in those figures, the navigation between slides requires more explanation. The navigation section below the content are enables users to move through the presentation slides. The user can click buttons “Previous” on the left and “Next” on the right for simple linear navigation, moving backwards and forwards respectively. In the case of branches (forks) in the presentation flow, more than one option will be available. A graph positioned in the centre of the navigation section shows the entire presentation flow, with each circle representing a slide. While the current slide appears in white with a green border, all other slides are represented in black circles. Users can click on any node to jump directly to that slide, allowing flexible navigation.
5.4 Feedback
To evaluate its effectiveness, a lecture was conducted with a Master’s Degree class in Informatics Education at Minho University, Braga. The session, with the participation of three professors and nine students, covered the need for educational tools that enhance programming instruction, highlighted the specific challenges Stepwise Source aims to address, and included a demonstration of the tool.
Students and teachers explored both perspectives by using the application directly while commenting on its use and usefulness. In addition to pointing out areas where the current version needed improvement, the feedback from this session, more importantly, affirmed Stepwise Source’s value as a relevant contribution for teaching and learning computer programming. Both learners and educators recognized its usefulness, suggesting it would be a meaningful addition to their educational toolkit. This positive reception highlights Stepwise Source’s relevance in supporting computer programming education.
This preliminary assessment session allowed for a confirmation on the positive aspects of Stepwise Source’s usability and user experience.
6 Conclusion
Stepwise Source positions itself as a flexible, useful and free tool to aid educators in creating on-line source code demonstrations that imitate the free-flowing cadence of live lectures. It implements a DSL that supports the creation of slides, styled annotations, and branches in explanation. It was reviewed by future informatics teachers, more specifically, computer programming, that reinforced the notion of its usefulness and applicability.
While a fully functional version of the tool has been developed, several enhancement ideas emerged during the development process and the assessment session that are not yet implemented. One potential improvement is to clarify the relationship between the styled annotation in the source code and its comment, possibly by incorporating note identification numbers. Additionally, offering varying levels of detail in the annotations could further personalize the learning experience, allowing students to engage at their preferred pace. At last, a Context-Free Grammar could be used to validate the learner’s input instead of a regular expression, which would further empower this tool.
Another suggested feature is the integration of a user management system, enabling educators to create dedicated classrooms where they could organize presentations by specific themes. This would enable them to share a curated list of related presentations through a single link, enhancing accessibility and coherence for their students. The last component of future improvement would be the possibility of embedding presentations into other web pages, including Learning Management Systems (LMS) such as Moodle.
Finally, a more robust and structured testing would analyse both the use on the educator’s part and also the students’ interaction with the tool. This procedure would result in a better overview of Stepwise Source’s usability and user experience, but also its value as a computer programming educational tool.
References
- [1] Cristiana Esteves Araujo. Training Computational Thinking: exploring approaches supported by Neuroscience. PhD thesis, University of Minho, March 2022. PDInf - prethesis.
- [2] Albert Bandura, W. H. Freeman, and Richard Lightsey. Self-efficacy: The exercise of control. Journal of Cognitive Psychotherapy, 13(2):158–166, 1999. doi:10.1891/0889-8391.13.2.158.
- [3] Yorah Bosse, David Redmiles, and Marco A. Gerosa. Pedagogical content for professors of introductory programming courses. In Proceedings of the 2019 ACM Conference on Innovation and Technology in Computer Science Education, ITiCSE ’19, pages 429–435, New York, NY, USA, 2019. Association for Computing Machinery. doi:10.1145/3304221.3319776.
- [4] Chin Soon Cheah. Factors contributing to the difficulties in teaching and learning of computer programming: A literature review. Contemp. Educ. Technol., 12(2):ep272, May 2020.
- [5] Create React App. Create react app. https://create-react-app.dev/, 2024.
- [6] Sofia Guilherme Rodrigues dos Santos. Automatic grading of programming exercises. University of Minho, August 2023.
- [7] Brendan Eich. The javascript programming language. Netscape Communications, 1995.
- [8] Express. Express. https://expressjs.com/, 2024.
- [9] Anabela Gomes and Antonio Mendes. Learning to program - difficulties and solutions. In International Conference on Engineering Education – ICEE 2007, pages 283–287, January 2007.
- [10] Philip J. Guo. Online python tutor: embeddable web-based program visualization for cs education. In Proceeding of the 44th ACM Technical Symposium on Computer Science Education, SIGCSE ’13, pages 579–584, New York, NY, USA, 2013. Association for Computing Machinery. doi:10.1145/2445196.2445368.
- [11] Khan Academy. Khan academy. https://www.khanacademy.org/, 2024.
- [12] Rodrigo Pessoa Medeiros, Geber Lisboa Ramalho, and Taciana Pontual Falcão. A systematic literature review on teaching and learning introductory programming in higher education. IEEE Transactions on Education, 62(2):77–90, 2019. doi:10.1109/TE.2018.2864133.
- [13] Bertrand Meyer. Codeboard. https://codeboard.io/, 2024.
- [14] MongoDB. Mongodb. https://www.mongodb.com/, 2024.
- [15] Python. Python. https://www.python.org/, 2024.
- [16] Yizhou Qian and James Lehman. Students’ misconceptions and other difficulties in introductory programming: A literature review. ACM Trans. Comput. Educ., 18(1), October 2017. doi:10.1145/3077618.
- [17] Paula Correia Tavares, Elsa Ferreira Gomes, and Pedro Rangel Henriques. Animation and automatic evaluation in supporting the teaching of programming. In 2015 10th Iberian Conference on Information Systems and Technologies (CISTI), pages 1–4, 2015. doi:10.1109/CISTI.2015.7170548.